


Saturday, March 17, 2012
Enjoy some funny pictures only have in Viet Nam.


Saturday, March 17, 2012 0
Friday, October 21, 2011

In the previous post “[Tutorial] Create photo slideshows with ProShow Gold on Windows” we introduced some basic steps for creating a photo slideshow with ProShow Gold software on Windows. In this post, we continue introducing some advanced techniques about layers, motion effect, caption, …
1. Transition effects
![[Tutorial] Using ProShow Gold: layer, motion effect, and caption transition effect](http://media.tinhte.vn/photo/var/albums/DuyLuan/transition-1.jpg?m=1318863956 "[Tutorial] Using ProShow Gold: layer, motion effect, and caption transition effect")
After inserting photos into the timeline, the photos are connected by small windows. These windows show the transition effects between photos. To change a transition effect, double click on the small window and choose a new one from the “Choose Transition” dialog.
To change the duration of a transition effect, double click on the number below the transition window and input your desired duration.
2. Layer Management
![[Tutorial] Using ProShow Gold: layer, motion effect, and caption layer management](http://media.tinhte.vn/photo/var/albums/DuyLuan/layers.jpg?m=1318863933 "[Tutorial] Using ProShow Gold: layer, motion effect, and caption layer management")
ProShow manages objects in each slide using layers. Therefore, you can add, edit, or delete layers easily. To edit layers, choose a slide you want to edit and click “Layers” button on the toolbar. The “Slide Options” dialog will appear and you can change the settings:
- Name and Notes: Layer name, layer notes.
- Layer Settings: scaling, position, zoom, aspect (should use Auto).
- Layers: list all available layers. Layers will be numbered. Click on Plus (+) button to add a photo or video. Click on Minus (-) button to delete a layer. The Arrow buttons are used to change the order of layers.
3. Edit Photos in a Layer
![[Tutorial] Using ProShow Gold: layer, motion effect, and caption layer](http://media.tinhte.vn/photo/var/albums/DuyLuan/editing.jpg?m=1318863928 "[Tutorial] Using ProShow Gold: layer, motion effect, and caption layer")
You can edit photos in a Layer easily by accessing to Layers and choosing Editing tab. In Adjustment, you can change brightness, white/black point, contrast, and Hue and Saturation. In Editing Tools, ProShow provides some functions: Rotate, Flip, Red-Eye removal, and Crop.
4. Motion Effect
![[Tutorial] Using ProShow Gold: layer, motion effect, and caption motion effect](http://media.tinhte.vn/photo/var/albums/DuyLuan/motion.jpg?m=1318863944 "[Tutorial] Using ProShow Gold: layer, motion effect, and caption motion effect")
In “Slide Options” dialog, choose “Effects” tab. In this tab, you can create motion for a photo. You can specify the starting and ending positions for a photo in the left and right windows, respectively. You also can change the size or orientation of this photo for the starting and ending positions. At the bottom, you can choose the motion speed for the effect. To preview the result, click on “Play” in “Preview”.
5. Add captions into photos
![[Tutorial] Using ProShow Gold: layer, motion effect, and caption caption](http://media.tinhte.vn/photo/var/albums/DuyLuan/text-1166743756.jpg?m=1318863948 "[Tutorial] Using ProShow Gold: layer, motion effect, and caption caption")
In “Slide Options”, choose “Captions” tab. You can input your text in the window of “Caption”. You can add many captions if you want. You can change the format of text, such as the font, size, and color in “Caption Format”. The “Text Effects” will help us create effects for the caption.
Good luck and enjoy your slideshows!
Friday, October 21, 2011 0
Wednesday, October 19, 2011

It rather fun to take photos with your Android devices. Why don’t you add some special effects to your photos to make them more beautiful? You can add some common effects (black/white, vignette, vintage, …) to your photos easily with photo editing apps (5 best photo editing apps for Android tablets). Herein, we introduce a special effect that can convert your color photos into grayscale ones with some remaining color regions. With this effect, the remaining color objects will stand out from other image regions.
We have two apps that can add this effect to your photos: Color Pop and Little Photo.
1. How to use Color Pop
This app can convert your color image into grayscale one. You can restore color for some image regions by drawing on your images. After running this app, open an image by capturing a new photo or opening a photo in Gallery. On the top of the interface, there are 3 main buttons: Move, Pop, and Unpop.
- Move: move the color brush.
- Pop: restore color for the image region.
- Unpop: remove color.
First, using Move button to move to the region that you want to restore color. Using Pop to restore color for this region. You can change the size of the brush by touching on the arrow icon at the bottom of the interface.

2. How to use Little Photo
- Open a photo that you want to add this effect. Touch on the screen to display menu and choose Effect-(2) > Color shade.
- Touch on “Tune” button on the left. A scrollbar will display at the center of the screen.
- Using the scrollbar to choose which color tone you want to retain.
- Finally, choose Options > Save to save your photo.


Enjoy your results.
Read more >> 5 best photo editing apps for Android tablets
Wednesday, October 19, 2011 1
Wednesday, October 12, 2011
Do you want to create photo slideshows with beautiful effects to share with your friends? In this post, we will show some basic steps to create a photo slideshow with PulpMotion Advanced 3 (PA) on Mac OS (for Windows users, ProShow Gold or Windows Live Movie Maker will be a good choice)
First you need to download and install PA from http://www.aquafadas.com/en/pulpmotion/adv/download.php . If your computer is not very powerful, remember to save your work frequently!
Step 1: create a new project and add photos to project
After installing, run PA program. Go to File > New to create a new project. Choose an appropriate theme for your project. For example, herein we choose “Books” theme.
![[Tutorial] Create photo slideshows with PulpMotion Advanced on Mac (Basic) 1](http://media.tinhte.vn/photo/var/albums/DuyLuan/PulpMotion/Screen%20Shot%202011-10-09%20at%204.14.17%20PM.jpg?m=1318158941)
The main interface will display with 2 parts: Media Manager and working area. If you want, you can move the Media Manager window to another position.
![[Tutorial] Create photo slideshows with PulpMotion Advanced on Mac (Basic) 2](http://media.tinhte.vn/photo/var/albums/DuyLuan/PulpMotion/Screen%20Shot%202011-10-09%20at%204.16.10%20PM.jpg?m=1318158945)
Now you can add photos to the project by clicking on the + icon in Media Manager. Next, you need to specify the folder containing your photos and click Open. You can also use iPhoto to manage photos and add selected photos directly to Media Manager.
![[Tutorial] Create photo slideshows with PulpMotion Advanced on Mac (Basic) 3](http://media.tinhte.vn/photo/var/albums/DuyLuan/PulpMotion/Screen%20Shot%202011-10-09%20at%204.21.58%20PM.jpg?m=1318158961)
You can drag and drop photos to the timeline located at the bottom of the interface. There are 2 options when we drag and drop photos: Add & Format and Add Media.
![[Tutorial] Create photo slideshows with PulpMotion Advanced on Mac (Basic) 4](http://media.tinhte.vn/photo/var/albums/DuyLuan/PulpMotion/keotha.jpg?m=1318158948)
Add & Format: after adding, the photos will have the format of the selected theme. To modify the settings, double click on the photos.
![[Tutorial] Create photo slideshows with PulpMotion Advanced on Mac (Basic) 5](http://media.tinhte.vn/photo/var/albums/DuyLuan/PulpMotion/Screen%20Shot%202011-10-09%20at%204.32.17%20PM.jpg?m=1318158975)
Add Media: only add photos to the timeline (usually using when you want to display a separate photo or a big photo). After adding, choose the photo and change its Name, Note, and Date. There is an option at the bottom to display or hide these photos in slideshow.
![[Tutorial] Create photo slideshows with PulpMotion Advanced on Mac (Basic) 6](http://media.tinhte.vn/photo/var/albums/DuyLuan/PulpMotion/Screen%20Shot%202011-10-09%20at%204.29.07%20PM.jpg?m=1318158976)
![[Tutorial] Create photo slideshows with PulpMotion Advanced on Mac (Basic) 7](http://media.tinhte.vn/photo/var/albums/DuyLuan/PulpMotion/Screen%20Shot%202011-10-09%20at%204.36.23%20PM.jpg?m=1318158990)
Step 2: modify your photos
If you want to modify photos in slideshow, double click on the photos to display the Image dialog as follows:
![[Tutorial] Create photo slideshows with PulpMotion Advanced on Mac (Basic) 8](http://media.tinhte.vn/photo/var/albums/DuyLuan/PulpMotion/Screen%20Shot%202011-10-09%20at%205.01.29%20PM.jpg?m=1318158987)
- Zoom: zoom in or zoom out your photos.
- Filters: apply a filter to your photos. If there is no filter, click on “Add Filter” to add some. Choose the filter and click Select to apply. To remove a filter, select it and choose “Remove Filter”. There are 5 pages of filters for you.
- Parameters: the parameters of filters.
![[Tutorial] Create photo slideshows with PulpMotion Advanced on Mac (Basic) 9](http://media.tinhte.vn/photo/var/albums/DuyLuan/PulpMotion/Screen%20Shot%202011-10-09%20at%204.59.14%20PM.jpg?m=1318158988)
Besides, you can crop and rotate your photos to fit the frame with the buttons on the left.
![[Tutorial] Create photo slideshows with PulpMotion Advanced on Mac (Basic) 10](http://media.tinhte.vn/photo/var/albums/DuyLuan/PulpMotion/anhle.jpg?m=1318158927)
Step 3: add and modify text
First, double click on photos to access the editing dialog. Then double click on the text to edit. You can choose new font, size, color… for your text.
![[Tutorial] Create photo slideshows with PulpMotion Advanced on Mac (Basic) 11](http://media.tinhte.vn/photo/var/albums/DuyLuan/PulpMotion/Screen%20Shot%202011-10-09%20at%205.11.22%20PM.jpg?m=1318159007)
![[Tutorial] Create photo slideshows with PulpMotion Advanced on Mac (Basic) 12](http://media.tinhte.vn/photo/var/albums/DuyLuan/PulpMotion/Screen%20Shot%202011-10-09%20at%205.15.35%20PM.jpg?m=1318159011)
If you want to add more text, choose Layout tab and click “Add Text” (A icon). The text “Double click to edit” will appear in your photos.
![[Tutorial] Create photo slideshows with PulpMotion Advanced on Mac (Basic) 13](http://media.tinhte.vn/photo/var/albums/DuyLuan/PulpMotion/Screen%20Shot%202011-10-09%20at%205.22.59%20PM.jpg?m=1318159030)
To access advanced settings, press ‘i’ to display the Inspector dialog. In this dialog, you can change the position, orientation, background color and many more for you text.
Step 4: insert music
Click M to open Media Manager and then choose Music icon and choose you music file. Drag and drop the music file to the timeline to add it into the slideshow.
![[Tutorial] Create photo slideshows with PulpMotion Advanced on Mac (Basic) 14](http://media.tinhte.vn/photo/var/albums/DuyLuan/PulpMotion/Screen%20Shot%202011-10-09%20at%205.25.48%20PM.jpg?m=1318159034)
In default, the time duration for each photo is set automatically. To change this duration for each photo, click on the clock icon and choose “Media Duration”. Finally, input your desired duration.
![[Tutorial] Create photo slideshows with PulpMotion Advanced on Mac (Basic) 15](http://media.tinhte.vn/photo/var/albums/DuyLuan/PulpMotion/Screen%20Shot%202011-10-09%20at%205.30.09%20PM.jpg?m=1318159035)
You can add several music files to the timeline.
![[Tutorial] Create photo slideshows with PulpMotion Advanced on Mac (Basic) 16](http://media.tinhte.vn/photo/var/albums/DuyLuan/PulpMotion/Screen%20Shot%202011-10-09%20at%205.35.21%20PM.jpg?m=1318159039)
Step 5: preview and export
Click Play to view your result. If you want to view high quality slideshow, click on stars and choose “High Quality Preview”.
![[Tutorial] Create photo slideshows with PulpMotion Advanced on Mac (Basic) 17](http://media.tinhte.vn/photo/var/albums/DuyLuan/PulpMotion/xem%20lai.jpg?m=1318159064)
Finally, you can export the slideshow by pressing “Command + E” or choosing File > Export.

There are many options that you can choose for the target file. After clicking Export, input your file name and click Save. Now you can upload this clip to Facebook or Youtube and share with your friends.
![[Tutorial] Create photo slideshows with PulpMotion Advanced on Mac (Basic) 18](http://media.tinhte.vn/photo/var/albums/DuyLuan/PulpMotion/Screen%20Shot%202011-10-09%20at%205.51.39%20PM.jpg?m=1318159053)
![[Tutorial] Create photo slideshows with PulpMotion Advanced on Mac (Basic) 19](http://media.tinhte.vn/photo/var/albums/DuyLuan/PulpMotion/Screen%20Shot%202011-10-09%20at%205.55.48%20PM.jpg?m=1318159055)
Read more >> [Tutorial] Create photo slideshows with ProShow Gold on Windows
(ref: tinhte.vn)
Wednesday, October 12, 2011 2
Tuesday, October 11, 2011
PhotoRem is a very good website that allows us to upload, manage, edit, and share images and videos easily. This website also can store your documents.
To use this service, go to website http://www.photorem.com/ . You need to register a free account before using its services. After logging in, you can use all the services supported from this website.


The main interface contains 3 parts. The library on the left allows you to search images and clips of Picasa or YouTube. The personal stuffs (Places, Animals, Music …) are placed in the bottom. All image and video editing tools are placed in the center.


First, in the middle of screen, choose File > New Presentation and name you file. Then, choose “Upload new files” to upload images or videos and use the editing tools to edit the uploaded files. You can create your own slide with images and share with your friends.


Some tools also allow you to share video captured from your webcam. You can share your documents via email and social networks (Twitter, Orkut, Facebook).
Main features:
- Friendly interface.
- Support most of file formats.
- Can upload video in FLV, MOV, and MP4 file formats.
- You can capture and share videos with your webcam.
- Upload and share presentation files and document files (PDF, DOC, XLS).
- Can search images and clips from Picasa, Youtube.
- Easily share images and videos via social networks.
- Allow us to manage and edit images and videos online.
Tuesday, October 11, 2011 1
Friday, September 23, 2011
Let relax with many awesome images and clips collected from Internet.
Relax with funny images and clips (Part 1)
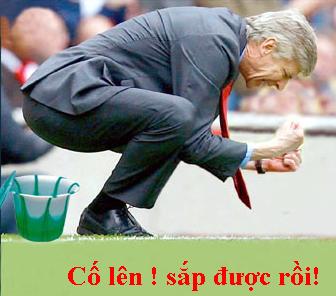
Yeah!!!! almost done!

^^

Be careful!

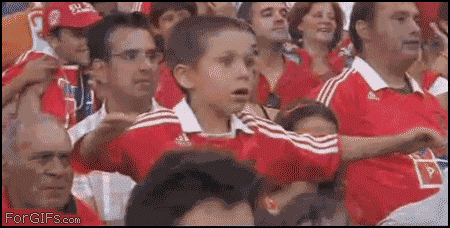
Wow! awesome
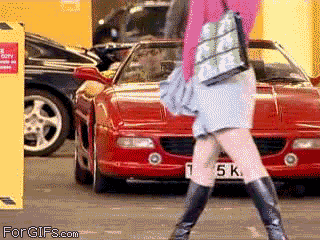
Because of beautiful girl!

Please!
New style.

No comment!
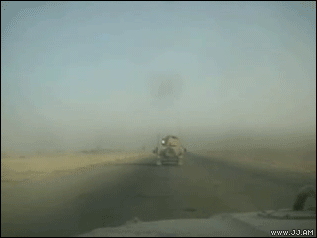
Good driver!
Friday, September 23, 2011 0