


Thursday, March 6, 2014

As you may know, Google Play and other Google Apps (Gmail, Google Maps, ...) are not available on Google X and therefore you cannot access and install apps from Google Play. Fortunately, it's rather easy to root Nokia X and install Google Apps.
First, download and uncompressed following files and copy uncompressed files and folders into Nokia X storage.
1. Framaroot & explorer: fshare, mediafire.
2. GApps for Nokia X: fshare, mediafire.
3. Extra apps (maps + launcher): fshare, mediafire.
Steps:
1. On Nokia X, go to Setting > Security and check "Unknown Sources" so that you can install downloaded apps to your Nokia X.

2. Install Framaroot and explorer apps which you copied into Nokia X storage.
3. Run Framaroot and choose Gandalf to root your device. After about 3s, your device is rooted and has SuperSE


4. Using Root Explorer to copy files in "3. NokiaX_Gapps" into /system/app
5. Change permissions for all copied files. Press and hold on a file and set rw-r--r-- as its permission as shown in following figure:

6. Restart your device and enjoy:

Thursday, March 6, 2014 0
Monday, February 24, 2014
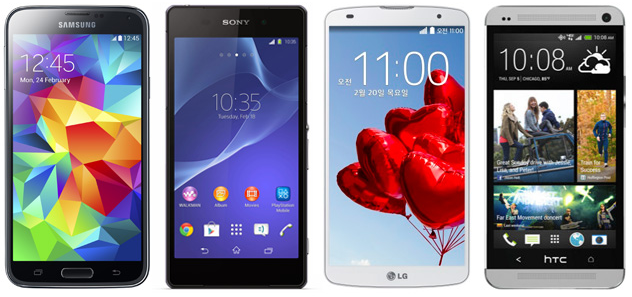
| Samsung Galaxy S5 | Sony Xperia Z2 | LG G Pro 2 | HTC One | |
|---|---|---|---|---|
| Starting price | N/A | N/A | N/A | Free (on-contract) |
| Known Dimensions | 5.59 x 2.85 x 0.32 inches (142 x 72.5 x 8.1mm) | 5.78 x 2.89 x 0.32 inches (146.8 x 73.3 x 8.2mm) | 6.22 x 3.22 x 0.33 inches (157.9 x 81.9 x 8.3mm) | 5.41 x 2.69 x 0.37 inches (137.4 x 68.2 x 9.3mm) |
| Weight | 5.11 oz (145 g) | 5.57 oz. (158g) | 6.07 oz. (172g) | 5.04 oz. (143g) |
| Screen size | 5.1 inches | 5.2 inches | 5.9 inches | 4.7 inches |
| Screen resolution | 1,920 x 1,080 (432ppi) | 1,920 x 1,080 pixels (424ppi) | 1,920 x 1,080 pixels (377ppi) | 1,920 x 1,080 pixels (468ppi) |
| Screen type | Super AMOLED Full HD | Triluminos Full HD (IPS) | Full HD IPS | S-LCD3 |
| Battery | 2,800mAh (user removable) | 3,200mAh | 3,200mAh (user removable) | 2,300mAh (non-removable) |
| Internal storage | 16 / 32GB | 16GB | 16 / 32GB | 32 / 64GB |
| External storage | microSD (up to 128GB) | microSD (up to 64GB) | microSD | None |
| Rear camera | 16MP, LED flash, OIS, | 20.7MP, LED flash, OIS | 13MP, LED flash, OIS+ | 4MP, LED flash, UltraPixel, OIS |
| Front-facing cam | 2.0MP | 2.2MP | 2.1MP | 2.1MP |
| Video capture | 4K | 4K | 4K | 1080p |
| NFC | Yes | Yes | Yes | Yes |
| Bluetooth | v4.0 | v4.0 | v4.0 | v4.0 |
| SoC | 2.5GHz Qualcomm Snapdragon 800 | 2.3GHz Qualcomm Snapdragon 801 | 2.26 GHz Qualcomm Snapdragon 800 | 1.7GHz Qualcomm Snapdragon 600 |
| GPU | Adreno 330 | Adreno 330 | Unspecified | Adreno 320 |
| RAM | 2GB | 3GB | 3GB | 2GB |
| WiFi | 802.11a/ac/b/g/n, dual-band | 802.11a/ac/b/g/n, dual-band | 802.11a/ac/b/g/n, dual-band | 802.11a/ac/b/g/n, dual-band |
| Operating system | Android 4.4 | Android 4.4 | Android 4.4 | Android 4.4 |
| Standout features | Fingerprint scanner, heart rate sensor, Ultra Power Saving Mode, IP67 certified, 4K video | IP58 certified, BRAVIA screen tech, Exmor RS camera, 4K video | KnockCode, Backside buttons, Mini view, Multi Window | UltraPixel camera, Zoe, BoomSound, BlinkFeed |
Monday, February 24, 2014 0
Friday, February 14, 2014

A small trick helps you to check your network signal with number instead of signal icon. It should be helpful when you are in areas having weak network signal. To display signal strength number, dial *3001#12345#* and press Call:


Friday, February 14, 2014 0
Thursday, February 13, 2014
There are several ways developers use to earn money from their free apps:
Publish free and paid versions:

It's quite common that developers publish their apps in two forms: free and paid. Paid versions are usually come with Pro or HD in their names. In free version, the authors can put a link to the paid version on iTunes or Play Store.
The free version acts as a "decoy". If users are satisfied with an app, they can buy a Pro version for more features. The main advantage of this method is that free apps tend to be downloaded 10 times more than paid apps.
Money Lover, for an example, is an app published in free and paid versions. The free app has been downloaded 600.000 times, in which about 7000 users decide to buy the paid version (~$5 USD) and $35.000 goes to author's pocket.
In-App Purchase

Optional purchase inside apps is a good way to earn money compared to selling apps with cheap price (e.g. $0.99). 49/50 apps having highest revenue in USA App Store belong to this category. For instance, on average Clash of Clans earns $3.000.000 USD per day in 2013 with In-App Purchase.
Ads
Displaying banner ads in apps is also a common way to earn money in free apps. To earn money with this method, yours apps should have a a lot of traffic. Flappy Birth is supposed to earn about $50.000 USD per day from more than 50k downloads.
Two big ad systems are iAds (Apple) and Admod (Google). On average, authors receive $2 USD for 100 downloads.
CPI (Cost per Install)
This is a quite new method to earn money with mobile apps. Users will see some "pop-up" in games or apps about "Install Now" for other apps. Usually, $0.8-$3 USD is paid for 1 app installation from CPI companies.
Funds
You can also try to raise funds for your apps from donors. If you have a nice idea, you can find funds from companies. In return, you can add companies' logos or names in your apps.
Thursday, February 13, 2014 0
Saturday, April 27, 2013

Unlocking bootloader is an important step to uproom an HTC Android smartphone. Fortunately, we have same process to unlock bootloader for all HTC Android phones.
Important: You will lost all data and apps installed by you, you should backup your phone first.You may also lost phone warranty!
Steps:
1. Go to http://www.htcdev.com/ and create your HTCDEV account.
2. Download Fastboot Files. Uncompress it to C:\fastboot.
3. Go to http://www.htcdev.com/bootloader/, choose "All Other Supported Models" > click "then begin unlock bootloader"
4. Click on OK or Next button in dialog messages.
Steps 1-4 help you to activate Fastboot mode. In C:\fastboot folder, hold Shift and right click and choose "Open command window here" to open CMD.
5. In command window, type: fastboot oem get_identifier_token
You will see several characters, copy text from <<<< Identifier Token Start >>>> to <<<<< Identifier Token End >>>>> and paste to htc webpage and click Submit.
Done! Check you email to receive Unlock_code.bin file.
After having Unlock_code.bin, click on the link in your email or perform following steps:
1. Copy Unlock_code.bin file to C:\fastboot.
In C:\fastboot folder, hold Shift and right click and choose "Open command window here" to open CMD.
2. In command window, type "fastboot flash unlocktoken Unlock_code.bin" (without quote)
3. You will see a confirmation message on your phone. Using volume and power buttons to confirm (choosing Yes). If you don't receive the confirmation message, do again.
Good luck!
Saturday, April 27, 2013 0
Thursday, January 10, 2013
Rooting is an important step to gain root access to your Android smartphones with super-user ability. You then can modify files in system folders, install custom ROMs or customise your devices. This post shows you how to root your Android devices with SuperOneClick.

Steps:
1) Download the latest version of SuperOneClick and save to your computer.
2) Connect your smartphone to your computer via USB port, turn on "USB Debugging Mode" (in setting) and unmount SD card.
3) Install SuperOneClick on your computer. If you have Samsung devices, choose "Samsung captivate" tab. Choose "Universal" tab for other devices.
4) Click Root and wait. The progress may take several minutes to complete.
5) Finally, restart your device.
Tutorial video
List of devices that can be rooted by SuperOneClick
Acer Liquid MetalDell Streak
HTC Magic (Sapphire) 32B
HTC MyTouch 3G
HTC Bee
LG Ally
LG G2X
Motorola Atrix 4G
Motorola Charm
Motorola Cliq
Motorola Droid
Motorola Flipside
Motorola Flipout
Motorola Milestone
Motorola Pro +
Nexus One
Samsung Captivate
Samsung Galaxy 551 (GT-I5510)
Samsung Galaxy Portal/Spica I5700
Samsung Galaxy S 4G
Samsung Galaxy S I9000
Samsung Galaxy S SCH-I500
Samsung Galaxy Tab
Samsung Galaxy 5
Samsung Transform M920
Samsung Vibrant
Sony Ericsson Xperia X8
Sony Ericsson Xperia X10
Sony Xperia Arc
Sprint Hero
Telus Fascinate
Toshiba Folio 100
Thursday, January 10, 2013 2
Saturday, May 19, 2012
After some simple steps, you can use Office 365 services (email, calendar, SharePoint Team Sites, Unified Communication US, …) from your iPhone.

Your can find email settings of Office 365 in Outlook > Outlook Web App > Options > See All Options > Account > My Account > Settings for POP, IMAP, and SMTP… These settings are important to connect your iPhone to Office 365. You can also change security settings, such as pin lock, mobile security, encryption and remote wipe, in Mail > Option > My Organization.
The Microsoft Exchange ActiveSync in iOS which is used to push email, calendar and contacts can be used to connect iPhone to Office 365 and to sync calendar, email and contacts between iPhone and Office 365.

First, in iPhone, go to Settings > Mail, Contacts, Calendars > Add Account. Choose Microsoft Exchange in the next screen and, then, input your email, name and password. The Domain box is left blank.

Next, iPhone with get necessary server information from Exchange Online server. If it fails to retrieve this information, you need to input server information of Exchange Server which can be found in your Office 365 Account page manually. Finally, you can choose which contents you want to sync with Office 365.
Saturday, May 19, 2012 2
Sunday, December 11, 2011
Root recent Android devices (Galaxy Nexus, Kindle Fire, HTC Raider, Galaxy S2 LTE (HD), Galaxy Note, HTC Sensation XL&XE, …)
![android-root[3]](https://blogger.googleusercontent.com/img/b/R29vZ2xl/AVvXsEimAcUsjyFRA5xaANlgQh1ZdCjzt4VnTGS8qLl5spMCBUyh1aRatJLV4vvBHFx27I95fDM6L1r61A6FpZe9tFFsoNPoCa_2B8TIRaiO3BU2VANRPbRR4fBQsD44IHDyCLPloTRuEIpxZpo/?imgmax=800 "android-root[3]")
Root is an important step to access your Android devices deeply. However, we need different ways to root different devices. In this post, we introduce how to root some important and new devices, such as Galaxy Nexus, Kindle Fire, HTC Raider (Vivid), SS Galaxy S2 LTE/LTE HD, …
Before starting
- The methods listed here have been tested on Windows.
- Download necessary softs:
Android SDK (run it to have drivers for your devices).Super One Click (SOC) latest version v2.31.
1) Root Google Galaxy Nexus
- Download 3 files usb_driver.zip, SamsungDriver.exe and Superboot
- Install SamsungDriver.exe (still install even your computer already had this driver)
* Unlock bootloader for Galaxy Nexus
- Turn on USB Debugging (Settings > Developer options). Reboot your device into Download Mode (press and hold 3 buttons, Power, Volume Up and Volume Down at the same time)
- Plug your device to computer (“Bootloader:Locked” text should appear now)
- Unzip file “Superboot” to a folder. Access to this folder and press “Shit+right click” on empty space > “Open command window here”
- In Command Prompt window, input “fastboot oem unlock” and Enter.
- Wait about 5 seconds
- Next, run file “install-superboot-windows.bat” in Superboot folder.
- Wait Nexus reboots.
- Done!
2) Root Kindle Fire
- Download SOE file (link above)
- On Kindle Fire, go to Settings > Device and turn ON “Allow Installation Of Applications”
- Plug Kindle Fire to computer. The device will activate USB Connection Mode, choose Disconnect to turn it off.
- Install driver for Kindle using Device Manager (use the Driver folder in SOC v2.31)
- Copy folder ADB to some a folder, such as C:\ADB
- Open Command Prompt (Windows + R > cmd > Enter). Chang to ADB folder by command “cd \adb”
- Input command “adb kill-server” > Enter. Next “adb devices” > Enter
- Run Super One Click soft and choose Root
- Wait your Device reboots
- Done!
3) Root HTC Raider LTE 4G
- Download Vivid_CWM_Root.zip , copy it into the root folder of internal storage of HTC Raider
- Turn on USB Debugging mode (Setting > Development)
- Go to htcdev.com to unlock Bootloader (remember install HTC Sync to have driver)
- Boot to H-Boot mode by press and hold Volume down and Power buttons
- Download Raider.zip and unzip into C:\Raider
- Run Command Prompt and change to Raider folder (cd \raider)
- Input “adb kill-server” > Enter. Next “adb devices” > Enter
- Input command “Fastboot flash recovery root_recovery.img” > Enter
- Go to H-Boot mode again
- Choose Recovery > Select install zip from sdcard > “Vivid_CMW_Root.zip” > Enter
- Done!
4) Root Galaxy S2 LTE/LTE HD
- Turn on USB Debugging mode (Setting > Development). If you can’t find, you can continue anyway
- Reboot to Download Mode (press and hold 3 buttons Home + Power + Volume down)
- Plug your device to computer and Windows will install driver for it
- Run Super One Click > Root > OK
- Done!
5) Root Galaxy Note (N7000)
- Download N7000 Note.zip and unzip
- Turn on USB Debugging mode and plug the device to computer
- Run “runme.bat” in N7000 Note folder
- Wait 5 minutes
- Done!
6) Root HTC Sensation XL and XE
- Go to htvdev.com to unlock Bootloader
- Turn on USB Debugging and plug to computer
- Download Sensation XL.zip (can be used for XE) and unzip
- Go to the unzipped folder, run “runme.bat”
- Done!
(vn version: tinhte.vn)
Sunday, December 11, 2011 6
Tuesday, November 22, 2011

This post collects and shows how to install custom Android 4.0 (ICS) for your smartphones.
How To Install Drew Garen ICS Alpha Build 2 On Nexus S
Note: we will have an official update to ICS from Google. However, if you want to use a Android Open Source Project (AOSP) now, you can install by following steps:
Your Nexus S must be rooted and have ClockworkMod Recovery flashed on it. It must have enough battery juice to last through the process; running out of battery during flashing process may permanently damage your device. Lastly, be sure to take a nandroid backup of your device’s current setup before proceeding to be on the safe side.
Step 1: Download preferred type of Drew Garen ICS Alpha Build 2 for Nexus S to your PC from here. On-screen buttons version comes with the on-screen buttons you see in Galaxy Nexus while the no-button version doesn’t.
Step 2: Transfer .zip file to your Nexus S’ internal storage via USB cable from PC.
Step 3: Boot into ClockworkMod Recovery mode. For this, you must turn off your device. HoldVolume Up + Power button simultaneously until you enter CWM mode.
Step 4: Format /system, /data and /cache from mounts and storage in main menu of ClockworkMod Recovery.
Also be sure to wipe data / factory reset from main menu.
Step 5: Go back to main menu and: install zip from sdcard > choose zip from sdcard > [name of file you transferred to your Nexus S in Step 2]
Step 6: Reboot device from main menu.
The full post can be found here.
How to install Android 4.0 ICS on Galaxy S II and S
Note: the current build (Alpha 7) is an alpha version and it is not stable. It is not suitable for daily use now! We will update the post when we have a stable version.
Your phone must be rooted for this flashing process. Follow our guide on how to root Galaxy S II or look up how to root Galaxy S on Google. You must also flash ClockworkMod Recovery.
Secondly, please ensure that your phone has enough battery to last through the process which doesn’t take more than 5 minutes if you’ve got all the files ready. If your phone does run out of battery during the process, chances are it may get “bricked”.
Lastly, be sure to take a nandroid backup which you can use to restore your previous setup.
With that out of the way, let’s get ICS flashed on our GS/GSII!
Steps to install Android 4.0 Ice Cream Sandwich Alpha ROM on your Samsung Galaxy S2 -:
Step 1: Download the alpha 6 version of the Android 4.0 Ice Cream Sandwich ROM for Samsung Galaxy S2 from here. Transfer this ROM to your phone’s internal memory. Now you can download (Galaxy S II ICS Alpha 7 and Galaxy S ICS Alpha 4)
Step 2: Restart your Samsung Galaxy S2 in Recovery mode. Users can use the Quick Boot app to boot into recovery mode. Alternatively, they can simply switch off their phone, and then press the Volume up + Home + Power button simultaneously to boot into recovery mode.
Step 3: First users need to format their phone’s /data, /cache and /system partition. To format the /data partition select the ‘wipe data/factory reset’ option. Format the /cache partiton by selecting the 'wipe /cache' option.
Format the /system partition by going into ‘mounts and storage’, and then selecting the ‘format /system’ partition option.
Step 4: Now, install the Android 4.0 Ice Cream Sandwich ROM on your handset, by selecting the ‘install zip from SD card’ option, and then navigating and selecting the ICS zip file which you had downloaded and transferred to your handset in step 1.
Step 5: Once the flashing process is done, repeat Step 4 again. You need to flash the ROM twice for it to work properly.
When the ROM is flashed navigate back to the main menu and select the ‘reboot system now’ option. The phone will take quite some time to boot.
Once your phone boots, enjoy Android 4.0 Ice Cream Sandwich on your Samsung Galaxy S2. Keep in mind that since this is an early alpha build, most of the stuffs are not working in this build including modem/baseband, capacitive buttons back lit and camera etc.

The full post is at Knowmydroid and Redmondpie.
How to install Android 4.0.1 ICS on Galaxy Tab
Now you can install Android 4.0.1 Ice Cream Sandwich for Galaxy Tab by following steps:
As with all ROM flashing processes, your device must be rooted and have ClockworkMod Recovery installed. The developers explicitly state that you must be on Android 2.x Gingerbread-based bootloader and have EXT4 file format.
Ensure that it has enough battery to last through the flashing process and please remember to take a nandroid backup of your device from ClockworkMod Recovery so you can revert back to your current, understandably more stable state in case you don’t like the ICS Alpha build.
Lastly, this is an Alpha build so do not expect all things to work out of the box. In its current state, it is not ready to be used as a daily driver. Wait for the betas or the actual stable release from the community for that.
Step 1: Download the latest build of Ice Cream Sandwich for original Galaxy Tab from this thread.
Step 2: Transfer the .zip file to the root directory of your Galaxy Tab.
Step 3: Turn off your Galaxy Tab. Boot into ClockworkMod (CWM) Recovery Mode by holding a specific key combination. This can be found by performing a simple search on your favorite engine.
Step 4: Format /system, /data and /cache from mounts and storage under main menu of CWM.
Step 5: Wipe data / factory reset from main menu.
Step 6: Go back to main menu and choose the .zip file you transferred in step 2 from install zip from sdcard > choose zip from sdcard. Ice Cream Sandwich will now be flashed to your Galaxy Tab.
Step 7: Reboot device from main menu.
If you followed the steps correctly, your Galaxy Tab will boot into an alpha build of Android 4.0.1 Ice Cream Sandwich. Have fun! If you have any issues or queries, visit the original thread on XDA.
Full post can be found here.
Tuesday, November 22, 2011 5
Tuesday, November 8, 2011

This post shows how to activate the panorama function for iOS5 devices (iPhone 4 or newer, or iPad 2).
For jailbroken devices
Step 1: It’s rather simple. First, go to “cydia/manage/sources/edit/add” and input “apt.thebigboss.org/repofiles/cydia/”. You can skip this step if your device already had.
Step 2: go to search tab, find and install “Firebreak”. Now panorama is ready to use.

For unjailbroken devices
Step 1: you need a computer (Mac or Windows) that can connect with your device (iPhone or iPad 2).
Step 2: Download iBackupBot (for Mac or Win).
Step 3: Run iTunes and backup so that we can use iBackupBot to read and change the backup file from iTunes later. You can use previous backup file.
Step 4: Run iBackupBot and browse to the backup file as shown in the following figure:

Step 5: find and open “Library/Preferences/com.apple.mobileslideshow.plist”
Step 6: Input a new code chunk: <key>EnableFirebreak</key><string>YES</string> as shown in the following figure.

Step 7: choose Save button to save and close the window. In iBackupBot window, choose “restore backup file” and choose “yes” to finish.

Good luck and enjoy.
(ref: 9To5Mac and tinhte.vn)
Tuesday, November 8, 2011 1
Saturday, November 5, 2011

Perfect Photo is a free photo editing app for your iPhone / iPod Touch. You can capture a new photo or select a photo in gallery to edit. This app cost $2 but it’s free in this week. Don’t miss a chance to download and test this app. You can download this app from iTunes AppStore.
This app contains 28 editing tools for editing your photos, such as crop, rotate, alignment, red eye reduction, sharpen, etc. The resulting photos can be saved or shared with your friends via Facebook, Twitter, Flickr or Tumblr. If you use iPad, find more information at Photogene. More information about this app: Perfect Photo.


Read more >> 5 best photo editing apps for Android tablets
Saturday, November 5, 2011 0
Thursday, November 3, 2011

Android now appears on many devices. Many Android apps are available on Android App market. If you have an Android device, you can download and try 10 good and free apps below.
1. Kindle For Android
The Kindle for Android is almost same as the iPhone version. With this app, you can buy and read more than 1 million books on Amazon.com. The electronic books, which cost from $9.99, are much cheaper than the printed ones.

2. The Weather Channel
With The Weather Channel app, you can check the weather forecast anytime. This app provides information for many places.

This app uses the database of Weather.com, a famous website providing information about weather. It also provides some other features, such as voice recognition, radar details, and weather maps.
3. Google Maps

Google Maps is installed in Android devices. You can download updates for viewing 3D map. This app is very useful for finding routes and locations.
4. Advanced Task Killer
After hours of using, your Android smartphone becomes slow because many apps run in background. Advanced Task Killer allows you to manage and remove apps to refresh your device.

5. TweetDeck

TweetDeck is a famous social network app. With this app, you can connect with other social networks: Twitter, Facebook, Buzz, and Foursquare.
6. Facebook
Facebook has become the biggest social network. You can use Facebook easily on Android device with this app.

This app contains most of functions of the web version, such as download images, share links, change status, check messages, watch videos, check News Feed, etc.
7. Adobe Flash Player 11
Whereas iPhone does not support Flash, Android is rather successful with Adobe Flash. Adobe Flash Player 11 improves the performance and fixes some bugs of previous versions. With this app, you can watch flash videos and play flash games.

8. Free WiFi Finder
Free WiFi Finder help us find free or paid Wi-Fi hotspots. After using GPS to locate your position, Wi-Fi Finder will tell you the nearest Wi-Fi hotspots and how to get there.

9. Last.fm
Last.fm is a music social network with a very big music database. Last.fm allows you to create your own music lists. You can listen to music without downloading them to your smartphones. You also can share your favorite music songs with your friends.

10. Gmail
Gmail has been updated to reduce the battery usage. With the latest version, Gmail downloads high priority emails first and, therefore, a fewer number of emails need to be downloaded.

You also can set different ringtones for different labels, which will help you decide to read or ignore incoming emails.
Thursday, November 3, 2011 0
Sunday, October 30, 2011

If you have a Android device, you may consider upping ROM to add more features and optimize your device. However, you may face to some problems after upping ROM, such as your device cannot start normally. What should we do with such problems?
Your device reboots forever: wipe data and catch
If you flash a new ROM and your device cannot go to the homescreen, you might forget to wipe your data (address, messages, apps…). Before upping a new ROM, you should wipe all data first.
")
To wipe your device, you can use the recovery tool which is used for flashing ROM (ClockworkMod Recovery, AmonRA or Open Recovery,...). Try to find something like “wipe data/factory reset” and “wipe cache partition” (use Volume Up and Down buttons for moving and Power button for choosing). Then, go to Advance > Wipe Dalvik Cache to clear Dalvik memory. Reboot your device to see result.
Your device accesses to Recovery mode directly: flash a new ROM
In the case you reboot your device and it goes directly to ClockworkMod (or similar recovery tools), the flashed ROM may contain errors. First, reboot your device one more time to check. If the error still remains, try one of 2 solutions: download the ROM again (some errors may occur when downloading) or find a new ROM (you may use the previously stable version).
You also need to check your SD card. You can use another SD card to flash ROM. For HTC users, since your devices cannot go to Recovery or Bootloader screen directly, you choose “Recovery” to continue. The bootloader of HTC is shown as follow:
")
Your device reboots and accesses directly to Bootloader: back to the original ROM
If this error occurs, there are some conflicts between the hardware and software. The best solution for this case is to use the original ROM.
I. Motorola: you need RSD Lite app. This app only runs on Windows. For example, if you have Milestone smartphone, you can use following steps:
1. Download RSD LITE v 4.5.3 at link http://www.mediafire.com/?wtord03xoyt
2. Download USB driver for Motorola milestone
for win 32 bit
for win 64 bit
3. Install above downloaded softs.
4. Download firmware (depending on your models) at http://and-developers.com/motorola_milestone:sbf
Download and unzip to have the firmware file *.sbf.
5. Check your battery (the battery should be more than 70%).
6. Open RSD Lite on PC.
7. Turn off your phone, connect it and PC via USB.
8. Go to bootloader (not recovery mode).
9. Browse to the firmware file with RSD LITE on your PC.
10. Click Start to start the flashing process.
")
II. HTC: you can flash the original ROM (also called RUU) inside the bootloader. First, using Google to find an RUU for your device. After unzipping, rename and copy the firmware file to your SD Card. Start your device and press and hold Power and Volume Down buttons at the same time to go to Bootloader. Your device will detect the RUU file and ask to flash. Choose “Yes” to continue.
III. Samsung: If you use Galaxy series, you can use Odin to flash the original ROM (OPS file).
1. Download necessary tools
- all_in_one: http://bigota.d.miui.com/tools/t959_tools.zip
- Driver for PC: http://www.mediafire.com/?jdu1cr2jw55f42c
- Stock tools (Odin, Pit, Stock 2.1) http://www.mediafire.com/?rsc0andifhea1up
then unzip them.
2. Install driver.
3. Open Oldin, in PDA browse and choose the original ROM, in PIT browse to PIT file.
4. Remove SD Card and sim from your device.
5. Go to Download mode (reboot, press and hold Volume Up and Down buttons and connect your device with PC via USB until “Downloading” appears on the screen.
")
Uncheck re-partition and click Start.
")
Wait until the process is complete and reboot your device.
")
A guide video:

IV. LG: Download Software Update [KDZ] and unzip to a folder. For example, you unzip into "D:\Android\KDZ_FW_UPD_EN". Before running this soft, you need to install MSXML 4.0 SP3 Parser (can be found inside the unzipped folder) first.
")
then run Software Update [KDZ] and choose settings for your phone. Such as for Optimus One P500:
- Type = 3GQCT.
- PhoneMode = DIAL.
- And click Open and browse to the original ROM (*.kdz).
Click “Launch software update” to start.
")
V. Dell Streak: (in Fastboot Mode, to go to this mode: press and hold Camera button when booting and choose Fastboot) use CLOCKWORK RECOVERY (for Windows, Mac, Linux) and copy “recovery.img” into the same folder.
VI. Sony Ericsson XPERIA:
1) Download Sony Ericsson PC Companion
Download Flasher.
Download Firmware:
X10: http://www.multiupload.com/G9TENJASZI
Update:
X10 Mini: http://www.multiupload.com/GM4VW1LNVV
X10 Mini Pro: http://www.multiupload.com/VNSYH9BC98
2) Install Sony Ericsson PC Companion, plug x10, click Mount--> check update. If update is not available, uninstall Sony Ericsson PC Companion.
3) Turn off UAC (User Account Control) in Wins 7 (Start Menu > Control Panel > User Accounts and Family Safety > User Account > change user account control setting >ok)
4) Restart your computer, unzip 2 files that are just downloaded and copy all *.sin files from folder “2-1-nordic-dec” to “X10Flash-2.1\Firmware”.
5) Now find device id (for example: 1&23cfa456&7&8) by
+ Go to Run, type “regedit” > OK and search “USB\Vid_0fce&Pid_adde” and you can find the device id like “USB\Vid_0fce&Pid_adde\1&23cfa456&7&8”.
+ Press F2 and copy 1&23cfa456&7&8 into DevID.txt in “X10Flash-2.1” and save.
6) Run X10flash .bat, choose 1, Y, choose OS.
7) Plug X10 and go to flash mode (turn of device more than 5s, plus USB cable to PC, press and hold Back button on X10 and plug USB to x10 (green light = ok).
8) press Enter in flasher, wait 2-3s and press Enter, unplug cable, turn your phone on and wait 2-3s for updating.
Your device is bricked: bring it to the warranty service
If your device is bricked, we cannot do anything with it. You don’t need to worry much because this error rarely occurs (usually because the device runs off battery when upping ROM).
Sunday, October 30, 2011 0